Wednesday, September 28, 2011

Roast Pig Cake - Big Success!

Every spring our school's parents club hosts a luncheon for the facilities crew. It's a BBQ theme, and I offered to make a cake. I had plenty of ideas, but none of them seemed right, until I thought of this idea. Granted, it is not an original, as I found out upon a web search, but I was grateful as there were so many examples from which to pull. I had no idea if this would work or not, I mean, how do you do the pig's feet?

Here's the pig before the details were added
First, I made two (or maybe three) 9x12 strawberry cakes (had to be pink on the inside, of course!), and froze them. I stacked  them, then carved the pig shape. I saved some leftover bits for the legs and snout, then used fondant for the feet, ears, tail, and lettuce (I made the ears several days ahead of time, then laid the pieces in a bowl so they could dry in the rounded shape). The apple is from marzipan.

I used one sheet of fondant to cover the pig, then molded it to fit. It came out better than I ever expected. It was so fun. And a big hit at the luncheon!

Tuesday, September 27, 2011

Angry Birds Cake Pops

Our son originally wanted a Lego Ninjago cake for his birthday, but:
  1. He didn't like the cake pop Ninjago idea
  2. The Lego man cake mold is $40. I was not about to spend that much ;) I didn't think I could do the figure justice carving it out of cake (too many angles), so I scrapped that idea.
So, I asked if he might want Angry Birds cake pops. I had seen the idea on a couple of sites (like this one). He was very excited about that idea! I had no idea what I was getting myself into.

If you haven't figured it out already, I am detail-obsessed.

This was one of the most involved, but most fun, projects I have tackled. I was dipping licorice and candy corn into candy coating for the beaks and some of the feathers.  I made eyes out of fondant, and cut endless amounts of licorice and gummy candy for the eyebrows. After nearly an entire day, I had about 50 cake pops. They were so adorable - I could not wait to share them! They were a huge hit at school, or course.


Now I have been asked to make Angry Birds cake pops again... along with towers and slingshot so he and his friends can play with them. Not sure I'm ready to sign up for that!

Friday, September 23, 2011

Summer Art Camp

Collage Name Cards
So this summer I decided to embark on an adventure into art with my children. Randy has been asking me for years to teach the children art, but I've always felt they were too small (some excuse, eh?). So, when Naomi asked to go to art camp this summer, I thought, why not do an art camp myself? She was super excited, and we invited a few friends. With our three children, that made 9 children.

I might be an artist by trade, but I am not a certified teacher. So, I needed to get some ideas for this camp that were age-appropriate for the 7-10 age group. I found a ton of them on http://www.artprojectsforkids.org/. Lots of great ideas for which I cannot take credit. Having a minor in Art History, I really enjoyed bringing in the history about art with the projects. I love abstract art, so I introduced the kids to a lot of artists of which they had never heard. I thought that was fun, and made for an interesting learning experience.

Camp went from 9-12 each day for a week.  Here's what we did:
Collage Name Bowls and Burlap Weaving Bookmarks

Monday - Recycling Day!
  • Recycled Magazine Bowl
  • Collage Name Book 
This was a super busy day, as the bowls took a lot of time. The kids did a great job. The collage name book was a combination of collage, crayon rubbing, and watercolor. They looked beautiful. 

Batik Japanese Windsocks
Day Two - 3-D Day! We created: 
  • Kandinsky shrinky dink jewelry
  • Metal Tooling
  • Burlap Weaving
  • Japanese Windsocks


Metal Tooling
Kandinsky Shrinky Dinks
There was so much information packed into this day! We learned about how colors interact when placed next to one another; about Batik painting (ours was a simplified version using glue and acrylic); embossing; and simple weaving. For our metal tooling project, the children interpreted Van Gogh's Starry Night and/or Sunflowers to create their piece. Our windsocks took three days to complete - one for the drawing, one for the glue layer, and one for the painting. Then I had to rinse and sew them all. I definitely took on a lot with this project, but it was worth it!


Mondrian Watercolor
Wednesday Was Abstract Day - I think my favorite day. 
Rothko Oil Pastels
  • Mark Rothko  - who often invoked strong feelings with his oversized canvases with soft, rectangular forms. We learned that art isn't just about color and composition, but that it can be an expression of emotion. The children were asked to think about an emotion as they were selecting their colors. 
  • Piet Mondrian - a master of geometric shapes, who was influenced by the rhythms of modern music. We learned how sounds can influence your art, as well as the balance of colors within a page.
  • Laurel Birch - a folk artist who is known for her brightly-colored cats. We learned about using colors creatively.
    Laurel Birch Cats
    Glue and Pastel Landscapes
    Thursday was Living Things Day. 
  • Glue and Pastel Landscape
  • Watercolor sheep

Watercolor Sheep

Some of our budding artists
We learned how glue, when it dries, can create interesting outlines on a page. We used black paper, and pastels once the glue dried. For the watercolor sheep, we learned about crayon resist with watercolor. The sheep were drawn with white crayon, then the children used watercolor to create the background. They turned out so cute!

Art Show!
On Friday, we spent the morning finishing our projects and preparing for the big art show. All the parents came, and we had a great show. We created so much artwork in one week - I was so proud of the children!

Wednesday, September 21, 2011

Flash Forward - Noah's Ark Cake


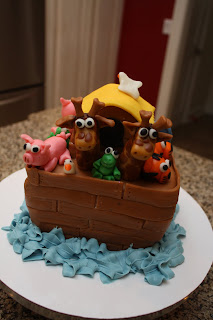
Here's a pic of my most recent cake. My friend wanted a Noah's Ark theme, and as usual, I see a challenge. If you've seen any of my illustrations of animals, you'll realize I love quirky animals. This project was so fun for me. I had tried to make a boat before for my sister - a pirate ship to be exact, and it was a Fail. I thought pulling the fondant up from the bottom would work for some crazy reason, and didn't reinforce the cake. The weight of the fondant caused the cake to split in the middle - and this was for my sister! I wanted it to be great, but it wasn't in the cards that day. Shockingly I forgot my camera and didn't get any pics of the cake. Need to get them from my brother in law so I can upload them...note to self here.

So I found an example of doing the boat using individual planks, and I loved the look of it - much more realistic than using my edible markers to draw the plank lines. It was a bit time-consuming (shocking, I know), but it looked great. Needless to say, this cake is well-doweled to make sure it would not split like last time. Glad I did that too, because when my friend picked it up she told me she was driving two hours away for the shower. Nothing stresses me out about my cakes EXCEPT for th
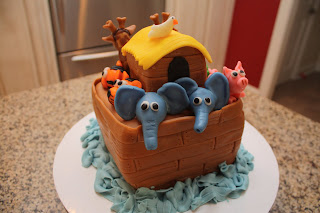
e transport portion. Thankfully, the cake stayed intact (even the animals), but it did shift on the plate a bit. It weighed a ton.

I spent my Project Runway watching time making the animals, which were super fun to make. I'm not sure what my favorite ones are.
I'm glad she took the cake with her, because if this was a cake for my family I would have been tempted to keep the animals forever. I still have the Baby Jesus from my Christmas cake from last Christmas because I can't throw him away :) Yes, perhaps I am a cake accessory hoarder...

Tuesday, September 20, 2011

Man, Woman, Dog, Bird and Banana

One of my favorite projects in college was the grab bag illustration. Our professor chose words out of a hat and we had to create an illustration using each of the elements. The elements were: a man, a woman, a dog, a bird and a banana. I created these people with bananas through their noses. It was so fun that I made a series of them with each character and some of the birds around them. After all these years, they are still some of my favorites.

My First Logo


Going with the theme of my earlier work, here's a scan of my first logo design from college. Now this will date myself, but my logo was designed on PAPER - each element was cut out (and I hope you can appreciate my Exacto blade skills here) of colored paper and assembled. We had a computer lab at school, but we were required to do most of our designing by hand. And, since computers didn't have much power back then, any effect took forever (a blur in Photoshop could take over an hour - for real), so it was actually easier to design by hand.

Anyway, the logo was for an actual store, though it was done unofficially. Wild Pair was a shoe store I really liked, but I didn't like their logo. Some of you might remember it.

I definitely gained a lot of knowledge by doing everything by hand, and it helped me in my first job at a print shop when I had to do paste up (which no one even does anymore). However, I am so grateful for the computer, where I can create endless variations of a logo in a snap. For some of my more recent logos, you can look at my web site: http://www.tingible.com/branding.html.

Monday, September 19, 2011

Beginnings


I guess I have to start somewhere
... For my friends who are not on Facebook, this is for you!

I came across this photo of one of my older cakes (the train) - it was made for my daughter's second birthday (she's 8 now). I
thought it was so great at the time. Of course, this isn't really a cake - it's rice krispie treats, but you can see how not-great I am at buttercream.

The other photo is from a cake I made when I was a teen. I think I made this for my sister, who acted in a lot of plays in high school. If you count the candles, it looks like this was her 16th birthday, which would make me 19. Notice that I have the candles
in, but have left the toothpicks I put in the cake to keep the foil from sticking. Nice touch. Still, for being a teenager, not a bad cake really.

On another post, I will see if I can scrounge up some old art of mine. That will be fun.

Thanks for visiting!